Tuesday, November 26, 2013

Perfect Mac and Cheese for your picky little ones! (with a secret!)


Success!!
 I can't even begin to explain to you how exciting this recipe is!

Calling all mamas with picky eaters:
I have successfully hidden not 1, but 2 different veggies in my son's mac and cheese!
aaaand he DIDN'T. EVEN. NOTICE.
Yep.
I am one proud mama today.

So, if you are having a hard time getting your little one's to eat their veggies, try this recipe out. It's super yummy and they won't even know it's good for them.


Ingredients:
5 Slices of Whole Wheat, Sugar Free Bread-toasted
1 Box Quinoa Pasta (2 1/2 Cups)
1 1/2 Cup Carrots-steamed
1 1/2 Cup Cauliflower-steamed 
1/2 Cup Vegetable Broth
1/4 Cup Ricotta
1/4 Cup Greek Yogurt
1/4 Cup Parmesan Cheese-for topping 
1-2 Tbsp. Salt
1 Tbsp. Coconut Oil
1 Tsp. Garlic powder
1 Tsp. Onion Powder  

Preheat your oven to 400 degrees.
Spread the bread out on a baking sheet lined with foil and sprayed with cooking spray. Bake the bread until it is hard and golden, or about 20 minutes.
(the bread topping is completely optional and if you're going for low carb, just skip it! My son is just a HUGE fan of croutons/bread crumbs, so it was a must for us.) 

While the bread is baking, fill 2 large pots with water, salt both generously and bring them to a boil.

When the pots of water come to a boil, you're going to throw all of the veggies (carrots and cauliflower) into one and the Quinoa pasta into the other.

(this stuff is amazing, btw!)
Cook the pasta until it's barely tender or "al dente" and the veggies until they are very soft.
Drain the pasta and return it to the pot. 
DO NOT drain the veggies, but remove them with a slotted spoon and save the cooking water. Place the veggies into a food processor and begin to puree. Use the cooking water to help the veggies along in the pureeing process.
Once the veggies are completely smooth with no lumps or chunks, return them to their pot.
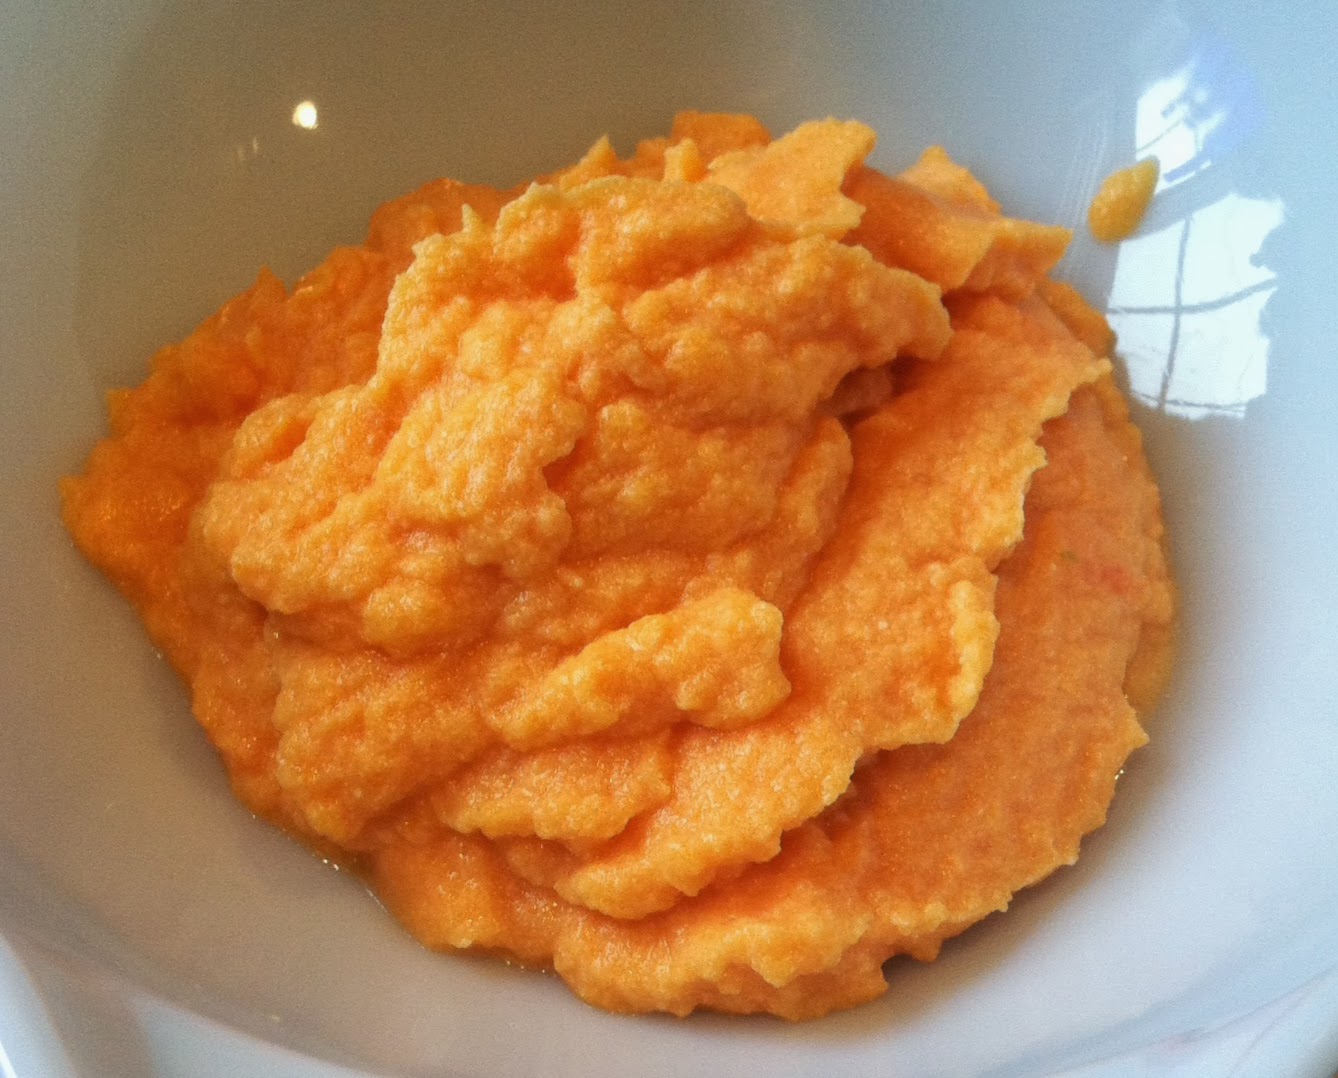
 Beautifully Pureed!


Turn the heat on medium and add the Coconut Oil, Ricotta, Greek Yogurt and seasoning. (Salt, Garlic Powder, Onion Powder)
Stir the mixture continuously, slowly adding the vegetable broth a little at a time.
Once it has all come together throw in your pasta and stir!
Make sure to coat every noodle evenly in the sauce.

Spray a medium size casserole dish and dump the mac and cheese in.
Crumble your bakes croutons over the top and sprinkle with Parmesan cheese.
This will go into the 400 degree oven for another 20 minutes.

 See?? Perfectly hidden veggies.


*side note*
Next time I make this, I am not going to bake it!
The sauce thickened up a bit too much while in the oven.
I think I'll just mix the sauce and pasta and serve!


Monday, November 25, 2013

Mushroom Caps Filled with Cauliflower Stuffing


A super healthy and delicious alternative to the tradition Thanksgiving stuff!
This recipe is also totally vegetarian and could be made vegan just by cooking some of the ingredients in Coconut oil or a vegan cooking oil rather than butter! I do love me some butter though...
It was a blast to make too..but I think I say that about all my food?

You'll have to forgive the lack of pictures on this particular blog.
I was cooking 3 dishes at once and had to be at my husband's family Thanksgiving in 3 hours...we were crunched for time!

This is what the finished product should look like!
I'm actually pretty bummed I didn't get more pictures...I was hoping to take a picture of the leeks...I had honestly never seen or cooked with one before this recipe and it was a lot of fun! They're insane.
Google it.
Ingredients:
14 Mushrooms Caps- large enough to fill
1 Leek
4 Cloves Garlic- finely chopped
1 Loaf Whole Wheat Sugar Free Bread
1 Head of Cauliflower
1 Cup Shiitake Mushrooms-chopped
3 Cups Vegetable Stock 
1 Egg
1 Tbsp. Sage
1 Tbsp. Parsley
1 Tbsp. Butter
salt and pepper to taste

Start by preheating your oven to 375 degrees.
Next, cube the whole loaf of bread. I was a stickler about getting each square about the same size, but it's all going to get mashed in the end!
Line a baking sheet with foil and spray with cooking spray. Lay the little squares of bread out on the sheet. Make sure they are evenly spread out.
Pop them in the oven for 10 minutes.
While those are baking cut the thick stem off of your cauliflower and cut all the little florets off. Do the same with a baking sheet and lay the cauliflower florets out on the sheet and salt them a bit. Put them into the oven with the bread.
After ten minutes, Take a spatula and flip everything over. (the bread AND cauliflower)
You want to ensure that everything is evenly baked!
Bake the bread for another 10-15 minutes and the cauliflower for 20-30 more. (make sure to flip the cauliflower every ten minutes)
Take your leek (such an awesome lookin thing) and cut that brown rooty part off of the bottom. Next cut off the grean leafy part.
You should be left with the long, light minty green colored part.
(pretty descriptive, huh?)
Cut that  width wise, cutting every 1/4 of an inch or so.
In a pan, melt your butter on medium and add your 4 cloves of Garlic and a pinch of salt and pepper. 
Cook the garlic for a minute of two in the butter then add your chopped leeks and Shitaki mushrooms! 
Let everything cook on medium for about ten minutes.

Place your cubed, baked bread, the nicely golden, baked cauliflower, buttered leeks, shiitake mushrooms and garlic all into a large pot and put in on the stove. Turn the heat on low and begin to add the vegetable stock 1 cup at a time. Make sure everything in the pot is getting wet with the stock. Stirring the whole time to assure nothing at the bottom burns.
Once all of the stock has been incorporated, add the seasoning (sage and parsley) and add another pinch of salt and a bit of pepper.
Turn off the heat and remove the pan from the stove. Crack your egg into the pot and incorporate VERY well.


Line yet another baking sheet with foil and spray with cooking spray.
Lay your mushroom caps upside down (so they look like little bowls).
Using a large spoon, spoon the mixture into the caps and with the palm of your hand, mold the stuffing into little mounds in the mushroom cap.
Fill each of the caps evenly, then pop them into the 375 degree oven for 25 minutes!

These were absolutely delicious and they even look pretty fancy!
This Thanksgiving, offer to make the stuffing and then bring these guys!
Everybody will be blown away, for sure.


Wednesday, November 20, 2013

Chicken Tortilla Soup

One of my favorite soups!


So I was feeling a bit lazy the other night (and a little cheap) so I dragged the kids and my hubby to the store and bought a million cans of veggies. Honestly, some of my favorite meals can be made with canned stuff.

I mean, I LOVE fresh veggies. I do! I love chopping up fresh, crisp fruits and veggies and creating amazing dishes with them, but sometimes...that's just not practical (or affordable).
 So, frozen and canned veggies are the next best thing!
BTW, you could always use frozen for all the canned ingredients I used! I always grab the reduced sodium stuff, but as a friend pointed out to me frozen veggies have much less sodium!
Totally up to you! The beauty of this soup is: you can't really screw it up!

Start by preheating the oven to 375 degrees.
Line a baking sheet with some foil and plop some thawed chicken on there.
Sprinkle the chicken with taco seasoning or mexican seasoning, I used premixed taco seasoning but you could always make your own, and drizzle a bit of olive oil on the tenders.

 The chicken will bake for about 20-25 minutes.
(when your chicken is finished baking, DON'T turn off your oven! You'll need it on to bake the tortilla strips)
While the chicken is baking, finely chop 4 cloves of garlic and one whole onion and place in a large pot with 2 tablespoons of butter and some salt and pepper. Cook the onions and garlic on medium until the onions just begin to lose their color or become translucent. 


Dump in the green chillies and crushed tomatoes.

 
 Love these colors!

 Once it has thickened it should look like this!
It took me about 10 minutes to get it nice and thick

Throw in the refried black beans and chicken broth and bring to a boil. While your soup is coming up to a boil, your chicken should be nicely cooked. Remove the chicken from the pan and shred it in a large mixing bowl. 

Dump the shredded chicken into your boiling soup along with a pinch more salt.
Reduce the heat and add the rest of your canned veggies. Let the soup simmer with the newly added veggies for 10-15 minutes then add the Velveeta and Taco seasoning. 
YUM. CHEESE.

Reduce the heat to the lowest setting and cover.

While your soup is coming together, cut 10 white flour (or whole wheat if you're looking for a healthier option) tortillas into strips and line on a baking sheet. Place them into the oven and bake for 20 minutes or until crisp.
If you like your chips golden, you can leave them in for a bit longer!
I left mine in for 30 minutes...the golden, crispy ones are my favorite!!
Now it's time to bowl your soup and dress it all up!
I added the tortilla strips on top of each bowl of soup.
I saw a few recipes where the tortillas were added to the pot of soup...I just didn't like the idea of soggy totillas, so I used the strips as part of my garnish!
It was a nice little crunch with each bite.
You can throw some crumbles Queso Fresco on top and a little bit of Cilantro and BAM.
An amazing (and bit fancy if I do say so myself)
looking soup.

_____________________________________________________________________


Ingredients:
1 Whole Onion, chopped
4 Cloves of Garlic, Finely chopped
1/2 Cup Canned Diced Green Chilies
2 Cups Crushed Canned Tomatoes
1 Can Refried Black Beans 
2 Cups Chicken Broth
9 Chicken Tenders Cooked, Shredded and seasoned
2 Cans Creamed Corn
2 Cans Black Beans, not drained
1/2 Block or about 2 Cups Velveeta Queso Blanco Cheese (mild)
2 Tbsp. Taco Seasoning
1 Tsp. Cayenne Powder
salt and peeper to taste 


Topping:
Tortillas cut into strips and baked
Queso Fresco Cheese, crumbled
Cilantro


Friday, November 15, 2013

Homemade Caramel Sauce and Oven Toasted Pecans

I decided to just lump these two recipes together since they are both pretty easy and go together so well on top of so many different desserts!


Homemade Caramel Sauce:

This is your only ingredient!
Yep. That's it!
(well, and a pot and some water...)
 
Fill a deep pot with enough water to COMPLETELY submerge the can.
 
Like this!
(and yes, it is VERY important for the can to be fully submerged and to stay that way..we don't want any exploding cans!!)
 
Place the pot of water with can inside on the stove. Turn the heat on to high and leave is until the water is boiling. (if the water begins to evaporate, you will need to replace it as to ensure that your can DOES NOT EXPLODE!!)
Once the water comes to a boil, reduce the heat to medium and allow the can to stay in the simmering water for about 2-2 1/2 hours!
Once again, if the water begins to evaporate...you really want to replace it!
 
After about 2 hours turn off the heat and allow the water to cool before you remove the can. Open up your can and..
 
TA DA!
Homemade Caramel! 


This Caramel goes great with apples, pretzels, marshmellows or nuts!
Like Toasted Pecans!

Toasting pecans is SUPER easy. 
First, preheat your oven to 350 degrees and grease a baking sheet.

Toasted Pecans:
1/2 Cup pecans
1 t. Cinnamon
1 t. Sugar
1 t. Nutmeg
1 t. Salt
 
Then, toss everything together in a Ziploc bag or small bowl and spread them out evenly on the baking sheet. 
Bake them for 10 minutes and take them out and flip them all over. Put them back into the oven for another 5 minutes. Once they bake, allow them to cool off before handling them!
 
These can be a great snack all by themselves or you can put them on top of some yummy shortbread with caramel sauce!
 
 
For the recipe to this yummy looking dessert, check out my blog on Simple Shortbread!


Simple Shortbread

Do you know what yummy dessert you can make with just these 4 ingredients?

Well, if you read the title...then yes, you already do.
It's shortbread!
Shortbread is such a delicious yet simple dessert! It's so easy to make I almost had my 5 year old do it for me.
Start off by preheating your oven to 300 degrees. Yep, just 300, that's it. This dessert cooks low and slow. 
(Often the best dishes are cooked that way!) 
Also, make sure you have a 10 inch spring form pan. It's so much easier to cut and serve this treat with one! (I guess you could use any old baking dish if you absolutely HAVE to...I still suggest going out and buying a spring form pan if you don't have one though!)
 Shortbread:
2 Cups Flour
3/4 Cups Confectioners Sugar (powdered sugar)
2 Sticks Softened Butter (room temp NOT melted!)
*plus a little extra butter for pan*
1 1/4 T. Coarse Salt
Start by sifting all of the dry ingredients together and set aside. Next, take your 2 sticks of butter that are room temp (they should be left out of the fridge for at least 20 minutes to ensure they are soft enough) and place them into a separate bowl and beat them! Beat them with a whisk until they are lighter in color and fluffy. 
They should look like this. It took me almost 10 minutes to get my butter to this point. If you wanted, you could always use an electric mixer...it would only take 3-5 minutes if you did.
Now. Slowly incorporate the dry ingredients into the butter. I did this a cup at a time. Each time you add a cup, make sure it is well incorporated before adding another. Once you're finished, form your dough into a ball.
Like this guy.
Butter your springform pan with a pad of butter (that just means a tablespoon or two on your fingers or paper towel). Make sure to get all the nooks and cranny's. Press your dough ball into the pan and flatten it out using a piece of plastic wrap. Leave the plastic wrap on top of the shortbread and pop it into the fridge for 20 minutes to cool.
Then, take it out and cut it into slices with a paring knife. (I didn't cut all the way through the dough, just deep enough to make indentations that didn't fade while baking. About half way through.) You can also take a bamboo skewer and poke little holes through out the shortbread. This aid in cooking and also looks super cute!
(this is a picture after it baked, I forgot to take one before putting it into the oven, but I wanted you to know what I meant by poking holes in the shortbread)
It needs to cool for another 5-10 minutes before baking.
 Once it has cooled again put it into the preheated oven for an hour. 
(I took mine out just shy of an hour)
Make sure to let it cool until it has completely pulled away from the edges of the pan. 
(20 minutes or so)
The you can remove the edge of the spring form pan and re-cut the shortbread into slices!


Such a pretty dessert!!
You can serve it just like this OOOOR you can top it with Homemade Caramel and Toasted pecans!
 Check out my blog on Homemade Caramel Sauce and Oven Toasted Pecans for how to make this yummy dessert!!


Tuesday, November 12, 2013

NOT your Grandma's: Turkey Meatloaf


Yes, like I said above..this is NOT your Grandma's meatloaf! Now, if you like the way your Grandma makes her meatloaf, then please, ignore this post. I, on the other hand, can't stand that dried out piece of meat smothered in ketchup that so many serve and proudly declare, "I made meatloaf!"
Nope. Sorry, Grandma.
This yummy, healthy turkey meatloaf is moist and loaded with veggies! Yep, and it still tastes amazing.
Start by preheating your oven to 400 degrees!
Next, we're chopping our "secret" ingredients. 
(they are secret in our house because my son is DEATHLY allergic to anything green or good for you) 

Secret Ingredients:
4 Cloves of Garlic
1 Onion
20 Mushrooms (yes, I counted instead of measuring)
2 Cups Spinach
2 Cups Canned Crushed Tomato

Chop up your onion and garlic and throw them into a heated skillet with a teaspoon or so of salt and about 2 Tablespoons of butter. (if you want a healthier alternative use coconut oil! I just ran out and forgot to buy more...so good old butter it is!)

I don't know about you, but I think veggies are pretty!

Cook the onions and garlic on medium until the onion begins to look translucent. (not white anymore) This took me about 10 minutes. Add 1/4 cup of chicken broth. Then chop up your mushrooms (all 20 of them) and throw them in with the onion, garlic and broth.

MMMMM

Let it all cook for another 10 minutes or so and it should look like this:


 Then throw in your 2 cups of spinach! (De-stemmed but not chopped)

I know it looks like a ton, but spinach cooks down A LOT and fairly quickly too.

See? This was only after 3-5 minutes.

Add another pinch of salt and 2 teaspoons of pepper. Then dump the 2 cups of tomatoes in and cook until everything gets thick. It'll be thicker than pasta sauce.

While this is cooking down. Combine:
3lb. Ground Turkey
1 Egg
2 Cups Panko Bread Crumbs
salt and pepper to taste


Use your hands to mush every up! 
(seriously though, it's the best way and it's a lot of fun)
 Turn off the skillet with your veggies and let it cool for 15 minutes. You want it cool enough that it won't cook the meat or egg when you add it into the turkey. Once it;s cooled, dump that pretty mixture into a food processor and pulse for 30-45 seconds. You don't want it completely pureed, just finely chopped.

Take about 3/4 (make sure to leave about 1/4 for the sauce on top of the meatloaf) of the finely chopped veggie sauce and dump it into the turkey. Combine well...again, use your hands! Place the Turkey into a greased baking dish and form it. Now, it's really up to you what shape you want you meatloaf to be. You could press it flat, but that would just be weird. I mounded mine so it almost looked like a hill.

Ok. Almost done. Add 2 more cups of canned crushed tomatoes to the rest of the veggies. Puree this until it is veeery well combined. For about a minute. The sauce will be redish brown (not a very pretty color, but it WILL taste awesome, I promise) Pour the sauce on top of your formed meatloaf and use a spatula to evenly coat the entire top with the sauce.

BAM! 
No...it does not look very good right now...but it will!
Cook that sucker in the preheated oven for 60 minutes.
Once it's cooked let it rest for 5-10 minutes before cutting in to.
It WILL look amazing once sliced and it WILL taste phenomenal. 

THIS 
is not your Grandma's meatloaf!

Thursday, November 7, 2013

Twice Baked Sweet Potatoes with Bacon Sesame Brittle


So this is what happens when I read cooking magazines..I get these crazy "gourmet cooking" ideas and destroy the kitchen in the process. I'm so sorry to my husband who has to clean up the kitchen after I cook! (He does so because he enjoys my food and wants to continue to eat)

I saw this recipe in a food magazine while at Barnes and Noble with my son this week and I just HAD to try it!!

Put 8-10 (depending on size) Potatoes on a foil lined baking sheet in an oven that has been preheated to 400 degrees. The recipe I followed said the sweet potatoes should bake at 400 for about 45 minutes. Mine took an hour and 10 minutes! Every oven is different and the size of the sweet potato will change the time it takes to cook them. You will know they are done when you can slide a knife all the way through the potato with ease. 

While my potatoes were baking I started making my Bacon Sesame Brittle!
 In one word, this Brittle was: YUM.
Strangest most amazing thing I have eaten in a while.

Brittle Ingredients:
6-7 Slices Thick Cut Bacon
1/4 Cup Sesame Seeds
1/3 Cup Sugar
1-2 Tbsp. Reserved Bacon Fat

Before starting the brittle, line a baking sheet with a piece of parchment or wax paper.

Then slice the bacon into 1/4 inch pieces and cook them in a heated skillet until they start to get crispy. (don's use any oil/butter to cook the bacon) Place bacon in a colander over a bowl to drain all the fat. (if you don't do this your brittle will be too greasy) Next place sesame seeds in the skillet (you can use the same one, just wipe out the bacon grease) and toast them just until they turn a medium tan. Put bacon back into the pan with the sesame seeds and add the sugar and a tablespoon or so of the reserved bacon fat. Cook this mixture, stirring often, until the sugar turns the color of milk chocolate. This took me about 5 minutes on medium high. Pour the mixture onto your lined baking sheet and spread thin with a spatula.

It should look a little bit like this!
Once the Brittle has hardened, break it up into shards. You can store the brittle for days in an air tight container at room temperature, if you'd like.
My Potatoes took forever so I watched a little Steven and Chris.
When my dinger went off, I got back into the kitchen sliced them in half, scooped them out and put the insides into a large mixing bowl! It was a bit harder than it sounded! (btw, give the potatoes 15-20 minutes to cool enough to handle them...I did not do this step because my fingers are pretty burnt from other cooking experiences, but those suckers were HOT) You need to leave and about 1/4 inch of potato around the skin for it to hold its shape...some of mine DID NOT look pretty!

This is how they looked once I scooped them out!
Sweet Potato Filling:
Insides of the Sweet Potatoes
1/2 Cup cream
2 eggs
2 Tbsp. White Miso Paste
(I was a little iffy about the Miso Paste...I have never tried it, but I was being adventurous and it everything turned out fine)
2 Tbsp. Unsalted Butter
1 Tsp. Ground Ginger 
1/4 Cup Scallions for garnish (I skipped this)
Mash the warm potato filling before adding the other ingredients. You want it to be super smooth! Add everything else to the sweet potato filling and combine. (working with the filling while it was warm is much easier!)
Use a pipping bag to fill the skins or a large spoon to scoop the filling. I used a freeser size ziplock bag. I filled it with my sweet potato filling and cut one of the corners off the bottom of the bag! It just looked...fancier than scooping the filling into the skins. You can do WHATEVER you want though!

Pop the potatoes back into the 400 degree oven for another 20 minutes and when the 20 minutes are up turn on the broiler for 3-5, just to get the tops of the filling golden!

After the cool a bit, garnish them with your bacon brittle!
A picture does them NO justice!
They were pretty yummy!
Next time I make these though, I might skip the Miso and ginger and add Vanilla, nutmeg and cinnamon instead...I just missed those flavors from my sweet potatoes! The bacon brittle, though? I'll probably be making that pretty regularly...I might even do bacon and pecans? And maybe give some out as Christmas gifts?!


To accompany our Sweet Potatoes I made Homemade Chicken and Zucchini Baked Stuffing using left over fried chicken!
Look for that recipe tomorrow.


Friday, November 1, 2013

Pumpkin Swirl Cheesecake Bars

So the fall weather got to me and I just had to make something pumpkin-y.
I've been cooking pretty healthy lately, but today, I didn't.
This pumpkin-y goodness came from cans and a box, but is OH so worth it.

Preheat that oven to 400 degrees, grease two 9 inch round cake pans and let's get bakin'.

Graham Cracker Crust:
3 Cups Graham Cracker Crumbs (I used boxed, if you're feeling daring you can crumble your own graham crackers)
2 Sticks Melted Unsalted Butter (yep, that's a lot of butter)
2 t. Vanilla Extract
1/4 Cup Sugar

Combine all the ingredients in a large bowl and split it between the two pans. Press the crumbles down into the bottom of each pan so it's nice and flat. You can pop them into the fridge while you work on the rest of the bars, the butter should stiffen up a bit and the crust will hold together better. (I know because I only put one pan in the fridge...guess which crust held together better? Yep.)

Cream Cheese Filling:
8 oz. Softened Cream Cheese
1/2 Cup Sour cream
1 Egg
2 Tbsp. Sugar

Combine all the ingredients very, very well with a whisk. Beat until there are absolutely no lumps. This took me 5-8minutes by hand. If you have an electric mixer, I'm sure it would only take seconds, but I'm a bit against using electronics in the kitchen. I like to do it all by hand. Set aside.

Pumpkin Filling:
2 Cans Pureed Pumpkin
1 Can Sweetened Condensed Milk
1 Egg
2 Tbsp. Flour
1 Tbsp. Pumpkin Pie Seasoning (you can use the individual seasonings if you don't have this. It's Cinnamon, Nutmeg, Gloves and Ginger. I'd say a Teaspoon of each?)
And a pinch of salt

Combine all ingredients and beat well until there are no lumps and everything is well incorporated. This only took me a minute or so.

Now for the fun part! I split the pumpkin mixture into the two pans and used a spatula to evenly spread it across the crust. Then I took a large spoon and put 3 big spoonfuls of the cheesecake mixture into the pumpkin. I used the tip of a knife and began swirling! You can do this anyway you'd like and make any kind of design. Mine was pretty boring.
Put both pans in the oven on the bottom rack and set a timer for 45 minutes. I ended up taking mine out with 3 minutes left, but who knows, yours might need those extra 3 minutes.
Take them out of the oven once they have finished cooking and let them rest for 20-30 minutes to make sure everything has set.

(Longest 30 minutes of my life)

Once they're cool, cut them up and eat! They're delish.


Who says amazing things can't come from a box?? (or can)